Getting started with Formik-Part1

Forms
Forms are very important to any business application. They are a powerful tool to directly interact with the user —> used commonly to gather data about the user or allowing them to control a user interface. From creating an account on any app to booking hotels, flights, train tickets, forms are used everywhere to collect information from the user.
Creating and validating forms in Reactjs is really a painful task. Here is what Formik comes to rescue us, the developers.

Formik is a small library that helps with 3 most annoying tasks:
- Getting values in and out of form state
- Validation and error messages
- Handling form submission
Initial setup
First of all, we will create a new react app.
npx create-react-app formik-demo
Once the app creation is complete, then install Formik in your app.
npm install formik --save
/*or*/
yarn add formik
Now our basic setup is done. Now let's create a simple form component in React and analyze the form state.
Now let's analyze the form state of the above form.
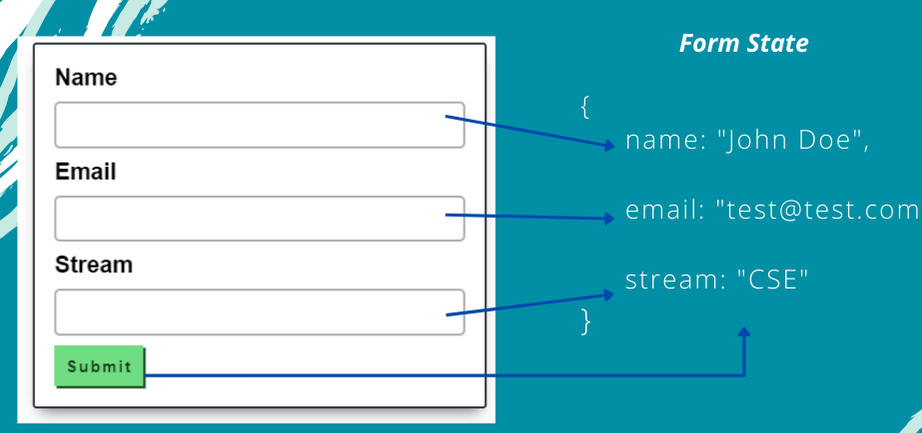
Now let's define the form state using Formik's, useFormik() hook. Below is the code snippet on how to define the initial form state in formik. We also have to add a submission function(onSubmit) to the useFormik( ) hook.
const formik = useFormik({
    initialValues : {
      name : "",
      email : "",
      stream : ""
    },
        onSubmit: (values) => {
      console.log("Form values:", { values });
    }
  })
The useFormik( ) hook returns a form state and some helper methods to handle the form modifications. For now we will focus on the below helper methods:
handleSubmit: It is a handler to handle the form submission.handleChange: It is a change handler to the following<input>,<select>, or<textarea>values: It keeps track of the form's current values.
Now let's modify our previous code and use the helper methods.
Now that, the change handlers for the input field is set up and the form submission handler is also set up, let's focus on validating the form fields.
I will now make all the form fields mandatory or required to be filled and also check if the email entered follows a valid email format.
Formik lets us define a validation function and that validation function needs to be assigned to a property called validate to the object that we pass to the useFormik( ) hook. Below is the code snippet of how to define the validate property.
const formik = useFormik({
    initialValues: {
      name: "",
      email: "",
      stream: ""
    },
    onSubmit: (values) => {
      console.log("Form values:", { values });
    },
    validate : values =>{
      //values will have all the form's values
      //we can access the fields as : values.name , values.email, values.stream
    }
  });
- The first condition of the validation function is that it must return an object.
So let's define a errors object and return from the validation function.
validate : values =>{
      //values will have all the form's values
      //we can access the fields as : values.name , values.email, values.stream
      let errors = {}

      return errors
}
- The second condition is that the keys of the errors object should be similar to that of the values object. Remember these keys should correspond to the name attribute of the form fields, i.e : (
errors.name,errors.email,errors.stream) - The third condition is that the value of the keys should be a string that indicates the error message for that field.
Now let's see the code snippet for marking the fields as Required.
validate : values =>{
      let errors = {}

      if(!values.name){
        errors.name = 'Required'
      }

      if(!values.email){
        errors.email = 'Required'
      }

      if(!values.stream){
        errors.stream = 'Required'
      }

      return errors
}
Now let's check if the email field is of a valid format against a regex.
validate : values =>{
      let errors = {}

      if(!values.name){
        errors.name = 'Required'
      }

      if(!values.email){
        errors.email = 'Required'
      }
      else if (!/^[A-Z0-9._%+-]+@[A-Z0-9.-]+\.[A-Z]{2,4}$/i.test(values.email)) {
        errors.email = 'Invalid email address'
      }

      if(!values.stream){
        errors.stream = 'Required'
      }

      return errors
    }
So everything seems ok so far, now let's see how to display the error message when the user inputs something wrong.
We have already seen that the formik object returned by the useFormik( ) hook contains a lot of useful properties and helper methods to manage our form state. This formik object also helps us to get hold of the error messages.
Let's see some of the properties of this formik object.
formik.values: if we log the value of this, on page load we will see the initial values of the form.
formik.errors: if we log this, on page load we will see an empty object logged because currently there are no errors.

Now if we visit one field and keep it empty, we will see the errors object is populated with the corresponding error messages for each field.

Now when the errors are populated we check if the name attribute of a field is present in the errors object, then we show an error message below the input field like Required or Invalid Email format etc.
Now let's modify our code and add the validations and the error messages.
Pheww!! that's a lot of work. But there is a UX problem in this. The problem is even if the user hasn't interacted with one of the fields it still validates and throws the error message, that's not good behaviour for larger forms having more than 10 fields right?
Ok, let's fix this, show error if there is one and the field is visited at least once. Here is how Formik helps us solving this.
To keep track of whether a field is visited we need to pass a prop name: onBlur to the input field and to this we pass a helper method formik.handleBlur . Now Formik stores the information of the visited fields in an object called touched which is of the same shape as the values object. The touched object will store true against each name attribute to mark if the fields are visited.
Now let's modify our code to display the error message iff the field is visited.
That looks good 😅. In the coming part of the blog, we will see how formik helps in reducing so much of boilerplate code, a more interesting way to write validation functions, write form level and field level validations and also how to use Formik with ChakraUI. Till then stay tuned 😊 .
Thank You for your patience. Happy Coding : )


